Monthly Archives: October 2014
HowTo: Use SurfTab Xiron on Mac for Development + ADB
After you enabled the developer mode and USB debugging on your SurfTab Xiron you have to add the Vendor-ID to an special file.
The easy solution is:
“echo 0x1e68 >> $HOME/.android/adb_usb.ini”
This will open the adb_usb.ini file in you .android folder and adds the vendor ID of Trekstor 0x1e68.
Ignore the warning and do NOT type android update adb.
After that you can call adb kill-server and adb start-server.
Have fun using USB Debugging on your TrekStor SurfTab Xiron!
How to fix Nexus 4 Black Screen and not charging problem
This morning it happened: MY NEXUS 4 WAS DEAD ! BLACK SCREEN !
Pushing the power Button had no effect and when i tried to charge it there was no battery symbol.
I tried everything with success !
1. Remove the Nexus 4 from the charger.
2. Press and Hold Power + Vol Down for 20 seconds
3. Connect the Nexus 4 to the Charger AND ….
4. Black Screen Problem should be solved !
if not try again. If nothing helps and you had problems charging you Neuxs 4 before. Try another usb cable to charge you phone. Maybe you charging port is broken. If you have a friend with a Qi Wireless charging station give it a try.
Download and Install Android Studio 0.8.12
Two days ago the brand new Android Studio version 0.8.12 (download) was release. It brings a totally new Android Virtual Device Manager (AVD Manager). Its more easier to use and allows you to quickly deploy your App on a Emulated Device (better integration). Other changes are mainly for a better and smoother usability. If you want do have more details please visit the Android Studio 0.8.12 change log page.
0. Pre-Requirements
For absolute beginner please first check if you have java installed (at lease v1.6). To do that simply type: javac -version
If this is not installed please go to the Oracle website and download the Java JDK.
1. Download Android Studio 0.8.12
Go to Android Tools Project Site to download the latest version of the Android Studio IDE. It is available for Windows, MacOS and Linux. As you can read in the NOTES the Android SDK is not included. So we also need to download that. Simply go the Android Developer Site and Download the Android SDK for an existing IDE. I’ve made the experience that you can’t download the SDK using Chrome or IE. So I had to use Firefox. Really odd.
As Windows user you can download the recommended Installer version.
2. Install Android Studio 0.8.12 on Mac and the Android SDK (as standalone)
Installation is quite simple. On MacOS you simply have to extract the android-studio-ide-135.1503853-mac.zip and put the “Android Studio.app” into you Program folder (as usual).
If you would start it now this Warning will be popup: Your Android SDK is missing, out of date, or is missing templates.
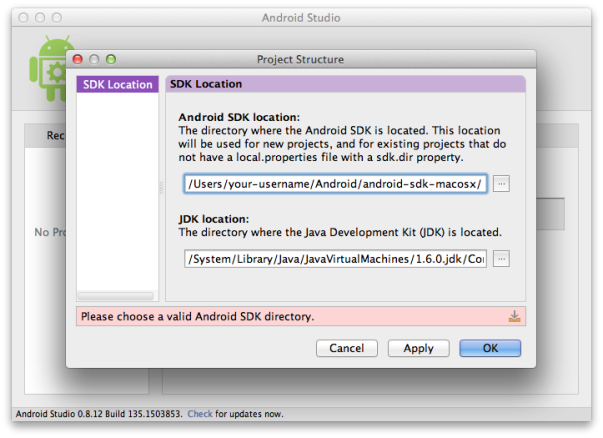
So first unzip the SDK zip, android-sdk_r23.0.2-macosx.zip. Next is finding a place where you want to store the SDK. I created a Android folder in my home-directoy and copied the android-sdk folder into it. So that the Path to my Android SDK is “/Users/your-username/Android/android-sdk-macosx/“. Please remember where ever u put it.
3. Configure the Android Studio for the Android SDK
Now we can start Android Studio. On the “Welcome to Android Studio”-Dialog we click “Configure” –> “Project Defaults” –> “Project Structure”. On the “Android SDK location” we click on the “…” Button and navigate to the location of the SDK. Than press “Ok”.
The Android SDK is now configured and can be used. With the little blue arrow at the top left corner we can go pack to the start dialog.
4. Create a Android Project
We can now select “New Project…” and click next. The wizard is quite easy to understand. Simply fill in all fields and press Next.
Example:
Application Name: My First Android App
Company Domain: mycompany.com or myname.com
Project Location: /Users/your-username/Android/Workspace/MyFirstAndroidApp
The next Page is about the Android SDK that you want to use to compile (create) your app. It atm it usually suggests to take API 15 which is fine. There is also a explanation for the impact of the selected API version. It says:
Lower API levels target more devices, but have fewer features available. By targeting API 15 or later, you app will run on approximately 87,9% of the devices that are active on Google Play Store.
So, if you want to support Devices running Android 1.6 you have to pick API 4. But you can’t use features like the fancy ActionBar if you do so.
On the next Page they may ask you for some licence agreement and then download the SDK API Version in case it’s not already stored in your android-sdk folder.
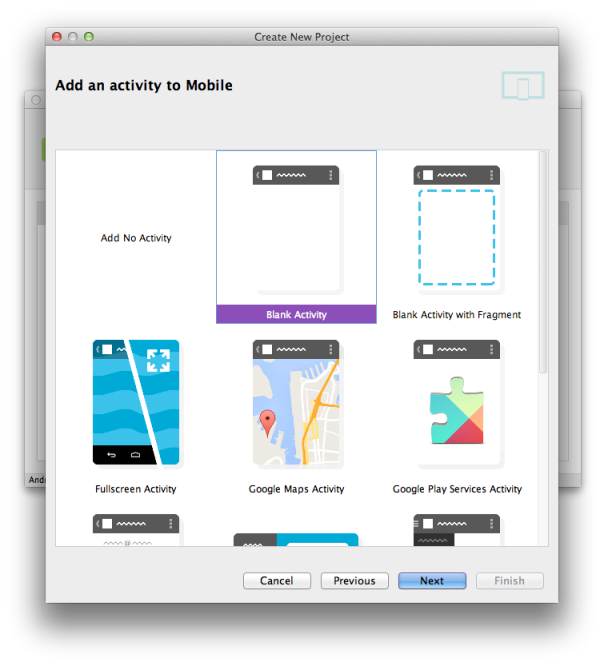
Than, finally the wizard asks you with which “template activity” you want so start. For now se select “Blank Activity” and click next.

Now you can name your Activity (the class), the Layout (xml file), the Title (name displayed on the running app) and the menu res name (xml to define the menu). You can rename stuff here if you like. Click FINISH.
5. Android SDK Manager
Click on the Android Symbol with the blue little download box. If you want you can select more
Android emulator: Failed to open the hax module
I had the Problem that i could not start the android emulator on my Macbook (Mac) using “Intel Atom x86”.
Problem:
emulator: Failed to open the hax module
hax is not working and emulator runs in emulation mode mac
Solution was downloading this fix.
https://software.intel.com/en-us/android/articles/intel-hardware-accelerated-execution-manager


